
Having to employ the services of a metal fabricator to give you a beautiful countertop design might be quite expensive and stressful. But with simple Diy epoxy countertop ideas, you can be sure to have a variety of experiments with different colours, materials and so much more!
Imagine having to integrate beautiful natural elements like flowers, river rocks and even items like bottle caps in your old countertop to give it a brand new appearance; beautiful right?
With this article, you can be sure to have sufficient DIY epoxy countertop ideas that would get you excited and ready to try your hands on different combinations and designs in no time!
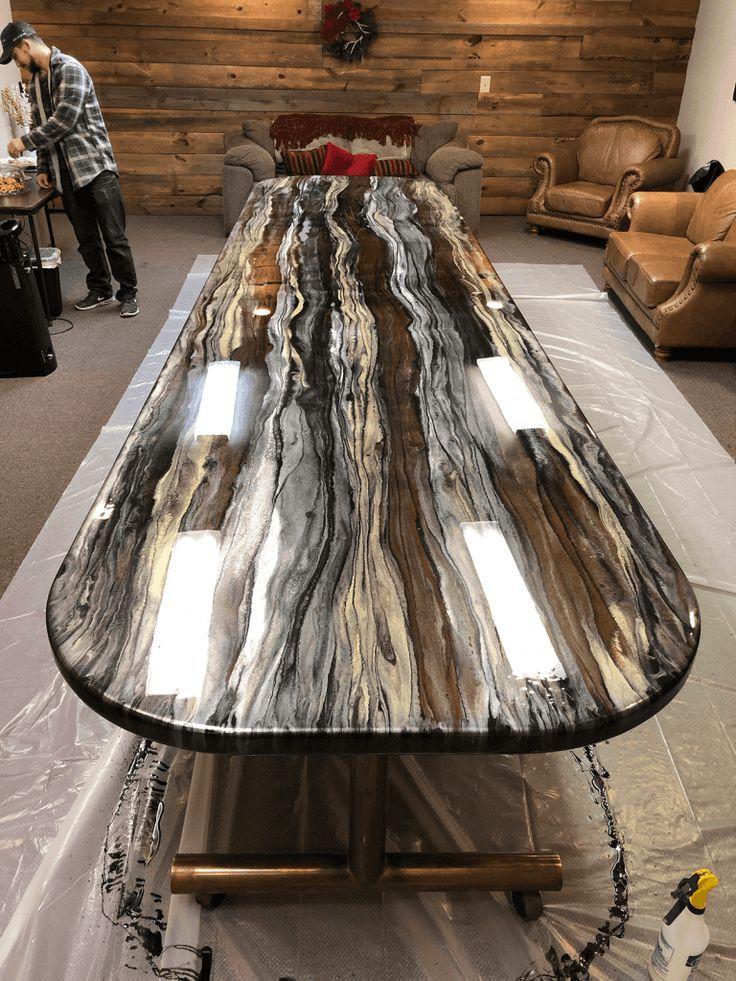
Epoxy straight vein technique
Source: pinterest
An epoxy straight vein technique is one in which a variety of colours are applied in a vein-like fashion from one edge of your table-top to the other, in a continuous motion. This, of course, is after you must have applied your primer, then any base paint you prefer—in this case, a black paint was applied as the base paint.
After the primer and base paint, comes the properly mixed epoxy and finally, the application of diverse soft colours in a vein-like structure, and your DIY epoxy countertop is ready to launch!
Below is a YouTube video on how to replicate the same pattern:
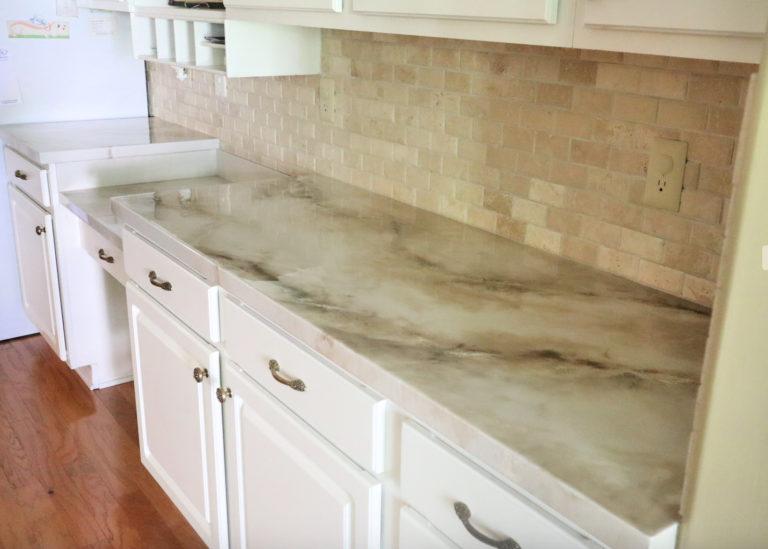
Plain laminate countertop epoxy
Source: pinterest
If you are one who doesn’t like too much flamboyant display of designs on your countertop, then this should best suit you, when it comes to epoxy countertop ideas.
You can easily get this done by simply applying your primer to the entire table, saturate the table with a base paint, let the paint dry for about a week, add your epoxy, then spray paint the epoxy with colours such as grey, white, light beige and metallic gold.
Note: you can have up to two or three epoxy coatings on your countertop, depending on the level of thickness you want to achieve for your DIY epoxy countertop.
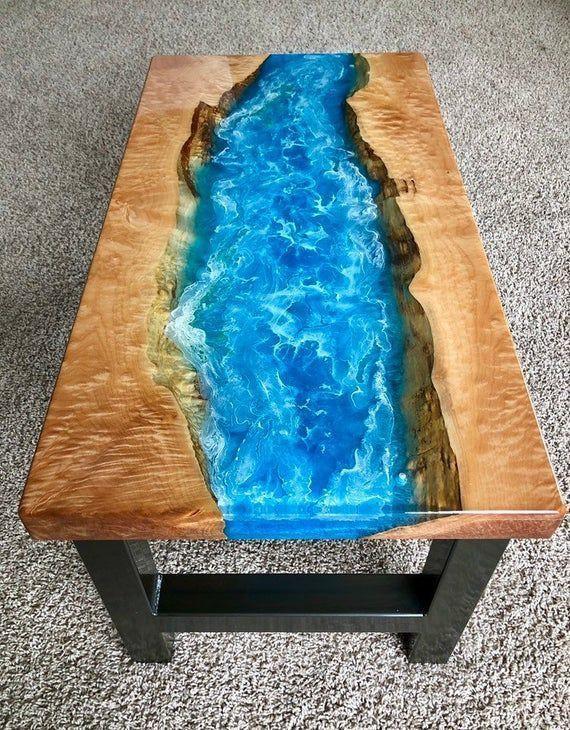
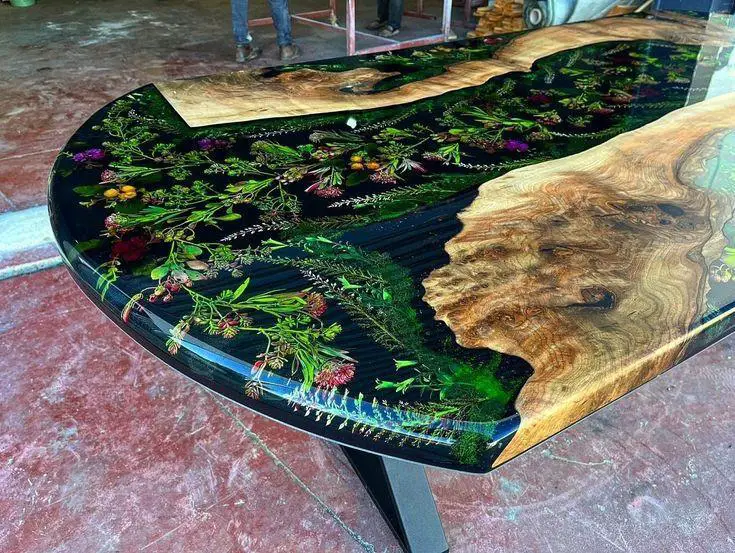
Epoxy Resin Ocean design
Source: Pinterest
If you are a nature enthusiast who loves a bit of natural imagery in your DIY epoxy countertop, then the ocean design should be the perfect idea.
All you’ll need are; two halves of smoothened wood, with the bark removed and the wood sanded till you get a uniform flat surface both on the top and bottom of the wood.
After doing all of these, you pour your initial layer of epoxy and place the wood on it, after which you fill up the entire ocean in the middle with resin. Then, you coat the whole table again then apply your paint—either a metallic blue or turquoise blue to the ocean in-between.
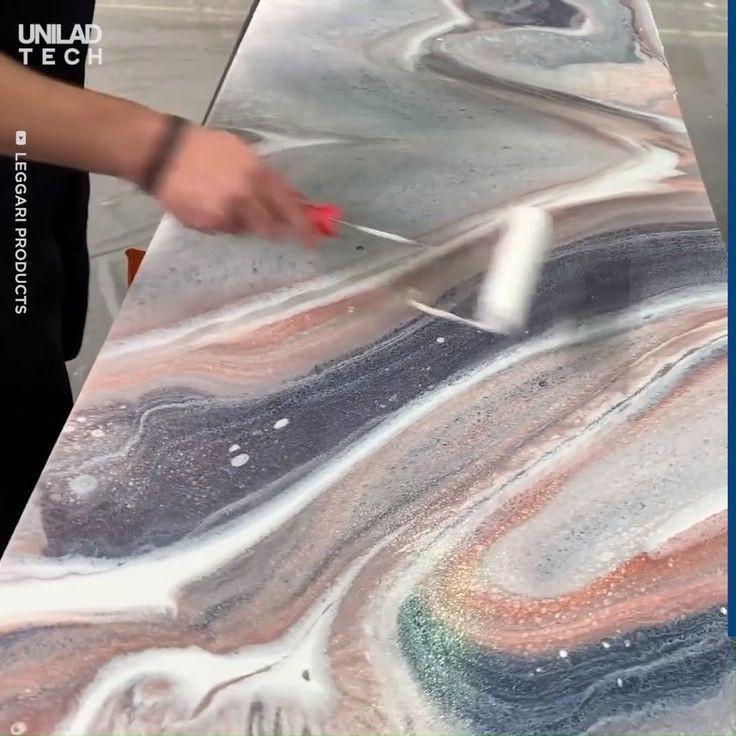
Dirty Pour Epoxy technique
Source: Pinterest
For one who wants something totally out of the norm, having a blend of different colours in a dirty pour mix will definitely suit your taste.
All you need do is cover up your epoxy countertop with primer coat, add the first layer of epoxy, draw out a rough pattern on it, pour out the dirty pour mix along the pattern you’ve made, add the top coat of epoxy and your dirty pour epoxy countertop is ready for use .
Here’s a video on how to properly achieve this result:
Bar top epoxy
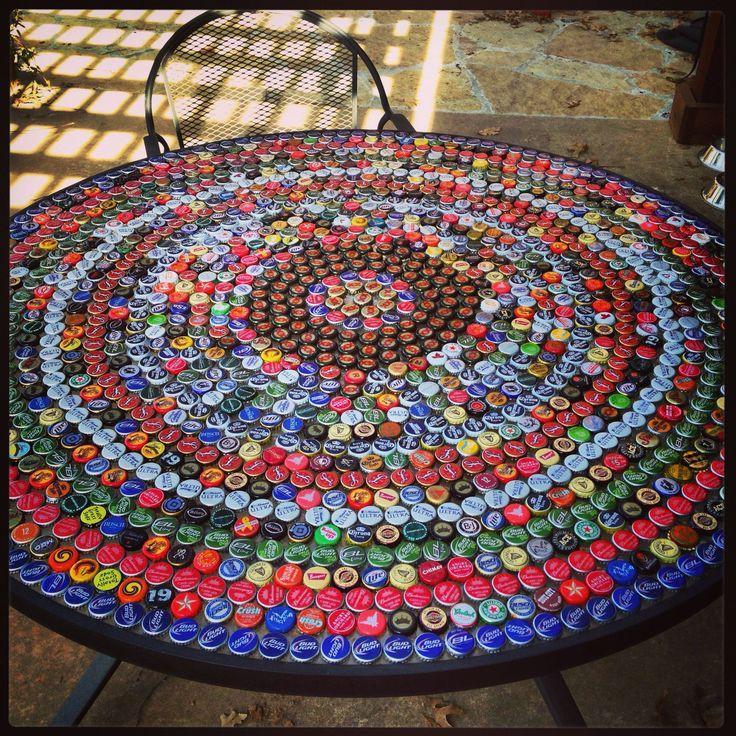
Source: Pinterest
If you are someone who loves relaxing in the evenings with your friends, over some bottles of beer, then having your epoxy countertop mapped with a colourful array of some of your amazing bottle covers will make your time together, even more thrilling. The sight alone should put you in good spirits.
To achieve a Diy bar top epoxy, you need tons of bottle caps neatly arranged over a tabletop that has been properly covered with primer and painted matte black. Make sure to sort these covers according to their colour shades, then flood with epoxy, according to your preference.
Black galaxy epoxy countertop

Source: Pinterest
Prime your countertop, cover in black paint, then add your silver glitter to your clear epoxy after which you pour the mix over the tabletop. After all these, try to spread the epoxy mix evenly till you have a crystal clear surface and you’ve got your dream galaxy countertop!
Check out how to get it done, in the video below:
Leaf countertop epoxy
Source: Pinterest
To achieve this design, cover your countertop in primer and paint its entire surface black. After doing this, arrange two halves of properly carved and flattened wood on both sides of your tabletop. Then arrange choice leaves in the exposed part of the table and flood with epoxy.
Make sure to give your black paint days to dry before applying your epoxy. Beautiful! Isn’t it?
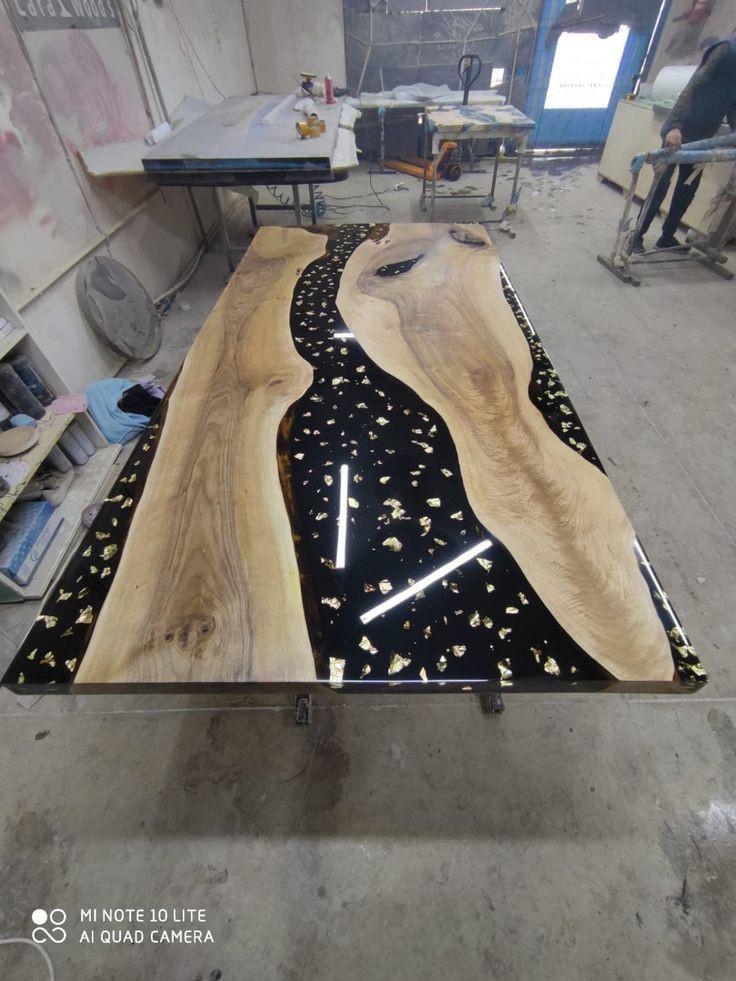
Black Epoxy resin river countertop
Source: Pinterest
The black epoxy resin river countertop involves all the processes used in the ocean epoxy design, except, this time around, you get to paint your countertop with a black paint before strategically placing your properly carved and flattened wood on the sides of the table. After this, you fill the exposed parts with bits of wood, beautifully placed, and then you flood with epoxy.
River Rocks epoxy countertop
The River Rocks epoxy countertop is a beautiful covering on your favourite table. To achieve this, tons of beautiful river rocks are collected and beautifully arranged on a marble surface that must have been primed and painted with a soft colour. Thereafter, you arrange your rocks all over the countertop then layer with epoxy according to your taste.
Source: Pinterest
Copper epoxy countertop
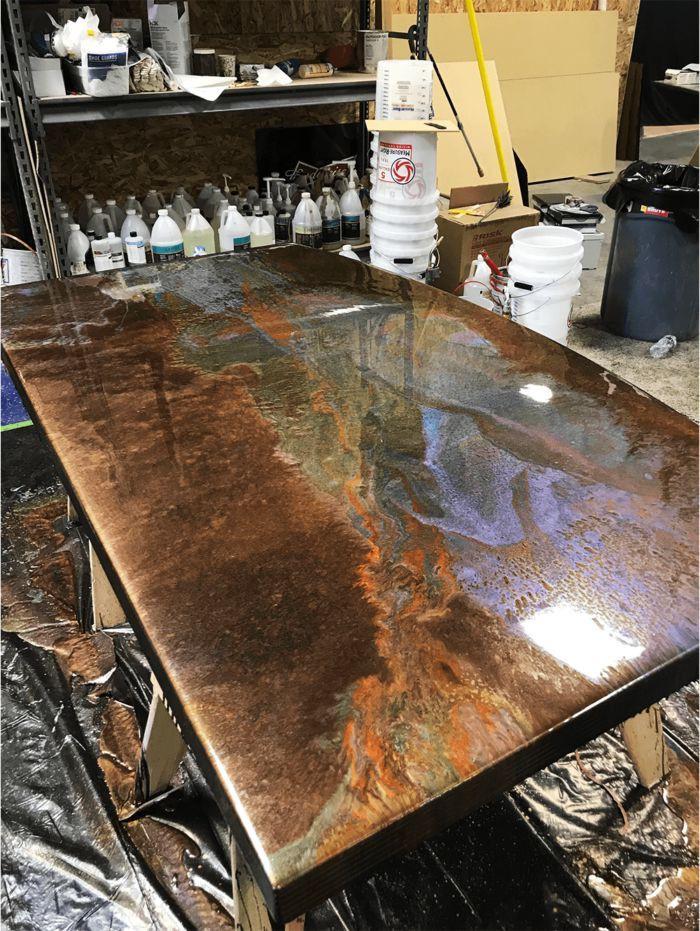
Source: Pinterest
Get your metallic copper and rust stone coat epoxy powder and mix with your epoxy. After doing this, you want to make sure you have an even spread of the mixture on your properly primed, black epoxy coated countertop, which has been tinted opaque with metallic powder.
This way you have the black epoxy mixture as the base covering and your copper-rust epoxy as your top coat.
You can try experimenting with different metallic colours of your choice, provided you follow the due process to give you a beautiful finish.
Here’s the link to how you can get this beautiful result:
Frequently Asked Questions
How do I mix my epoxy properly?
To mix your epoxy properly, you need to first of all know the kind of epoxy you are working with. This is because depending on the type, you can mix by weight or by ratio. Make sure to use a scale which is highly accurate in measurement.
To have a flawless mix, ensure to add your hardener before you pour your epoxy in the mix. Make sure to carry out a very thorough mix. For this, you need two buckets. When you mix in one bucket for about three minutes, you pour out your mix in another clean bucket and mix for the same amount of time.
After this process of mixing is concluded, you can then pour in your colours. If you are working with a number of colours, then the amount of each colour poured in would be smaller. Ensure you mix carefully and slowly to avoid air bubbles on your epoxy countertop.
How long does it take before I add the second epoxy coat?
When it comes to the duration between when you pour your first epoxy coat and when you add the second, one thing to put into consideration is the level of hardness or firmness of the first coat. Normally, it takes 4-6 hours after the first flood before you add the second layer of epoxy; but if the first epoxy coat has totally hardened, it is advisable to first sand the surface lightly before adding the second epoxy coat to enable proper bonding.
How long will it take my epoxy to dry?
First of all, you need to understand that epoxy is largely affected by humidity and temperature. The ideal epoxy temperature is 70°. If it goes beyond 75°, then the epoxy tends to dry quicker, and if lower, it might not cure properly. However, it gets almost completely hardened after a week.
Another huge factor to consider is the time it takes to mix the epoxy in the container. This is called Pot Time. You need to pour out the epoxy for immediate use, as soon as you are done mixing. A standard time of one hour is needed to use most epoxy for your design.
You can take 3-4 days to sand and polish your epoxy. But however you get it done, make sure to go through the manufacturer’s instructions before use. You never can tell, these estimations can tend to change, depending on the products you are making use of.
How do I prevent air bubbles?
Firstly, when flooding with epoxy, ensure to first add a thin layer before a thicker layer. Also, you can prevent air bubbles from forming by placing the container with the epoxy and the one with the hardener into a bigger container that has warm water in it and let it sit for about fifteen minutes. Excess heat will incur more air bubbles.
Are epoxy countertops suitable for outdoor activities as well?
Majority of the epoxy brands you see, design epoxy for indoor activities alone. This is because exposure to harsh sunlight and UV rays can make your countertop turn yellow. In all, epoxy is not very heat resistant.
Conclusion
In all of your Diy epoxy countertop experiments, ensure to factor in safety and precaution. You also want to ensure you don’t get epoxy stains on your floors and other exposed surfaces; therefore, you’ll need to create a kind of canvas with a thick cloth cover all over your floors, as well as tape other exposed surfaces, not needing epoxy, with an aluminium tape.
